how to load a removal van? Yes! This is the article. Moving home can be an exciting yet daunting task, and loading furniture into a removal van is a crucial aspect of the process.
Properly loading your furniture ensures its safety during transit and maximizes space in the van, making the relocation smoother and more efficient. In this guide, we’ll explore essential tips for loading furniture into a removal van when moving home, with reference to removalsselfstorage as your trusted resource for all your moving needs.

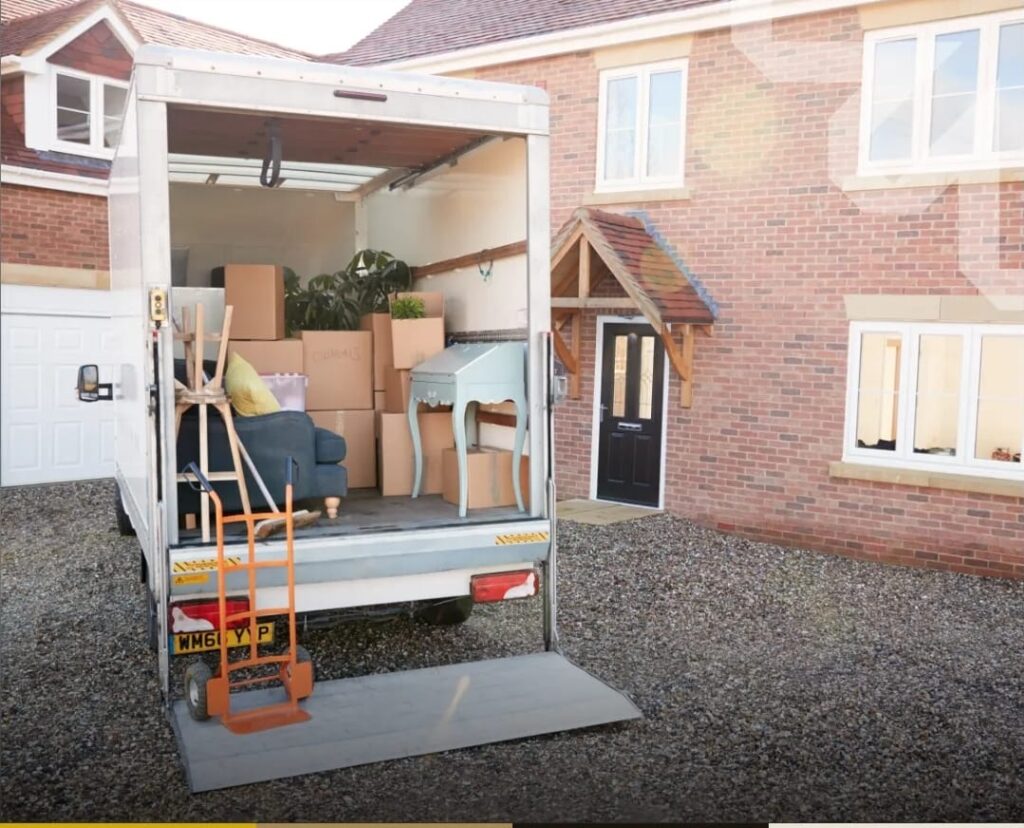
1. Plan Ahead: Before you start loading furniture into the removal van, take some time to plan the process. Measure the dimensions of your furniture and the van to ensure everything will fit properly. Create a layout plan for loading, prioritising larger items and considering the order in which they will be loaded.
2. Disassemble Furniture: To make the most of the available space in the removal van, disassemble large furniture items such as beds, tables, and wardrobes. Remove legs, shelves, and other detachable parts and pack them separately. This not only saves space but also makes furniture easier to handle and help to load the furniture into the removal van
3. Protect Your Furniture: Protect your furniture from scratches, dents, and other damage during transit by using appropriate packing materials. Wrap delicate items in furniture blankets, bubble wrap, or moving pads to provide cushioning and prevent breakage. Secure protective coverings with tape or furniture straps to keep them in place.
4. Load Heaviest Items First: When loading the removal van, start with the heaviest and largest items first, such as sofas, mattresses, and dressers. Place these items against the walls of the van to create a stable base and distribute weight evenly. Use furniture sliders or dollies to maneuver heavy pieces safely into the van.
5. Utilise Vertical Space: Maximise the available space in the removal van by stacking lighter items on top of larger ones. Place chairs, small tables, and other lightweight items on top of sofas, dressers, and mattresses to optimise space. Ensure that items are stacked securely to prevent shifting during transit.
6. Fill Empty Spaces: Fill any gaps or empty spaces between furniture pieces with soft items such as pillows, cushions, and blankets. This helps to cushion and protect your belongings and prevents them from shifting during transit. Use moving straps or bungee cords to secure loose items and keep them in place.
7. Distribute Weight Evenly: Distribute weight evenly throughout the removal van to maintain balance and stability during transit. Place heavier items towards the front of the van, closest to the cab, to prevent the van from becoming top-heavy. Avoid overloading one side of the van to prevent tilting or tipping during turns.
8. Secure Everything Properly: Once all furniture items are loaded into the removal van, take the time to secure everything properly. Use furniture straps, ropes, or bungee cords to tie down larger items and prevent them from shifting or sliding during transit. Double-check that all items are securely fastened before closing the van doors.
9. Consider Professional Assistance: If you’re unsure about loading furniture into the removal van safely and efficiently, consider seeking professional assistance. Removalsselfstorage offers expert moving services, including loading and unloading assistance, to ensure a smooth and stress-free relocation experience. Their team of skilled movers can handle the heavy lifting and logistical details, allowing you to focus on other aspects of your move.
Loading furniture into a removal van when moving home requires careful planning, preparation, and execution. By following these essential tips and leveraging the resources available at removalsselfstorage, you can ensure that your belongings are loaded safely and load perfectly into the removal van. Whether you’re moving locally or long-distance, mastering the art of loading furniture into a removal van is essential for a successful home relocation.

DIY Home Removal Guide: Step-by-Step Loading of Furniture into a Removal Van
Embarking on a DIY home removal journey can be both exhilarating and challenging. While taking control of your move offers flexibility and cost savings, loading furniture into a removal van requires careful planning and execution to ensure a smooth and successful relocation. In this comprehensive guide, we’ll provide you with a step-by-step approach to loading furniture into a removal van, along with valuable advice on seeking professional assistance from trusted experts like removalsselfstorage if you’re in Kent, Essex, London, and Surrey.
Step 1: Assess Your Furniture
Begin by assessing the furniture you’ll be moving and determining which pieces need disassembly. Take measurements of large items to ensure they’ll fit through doorways and into the removal van. Identify any fragile or delicate items that require special handling and protection during transit.
Step 2: Gather Packing Supplies
Gather all the necessary packing supplies, including furniture blankets, bubble wrap, packing tape, and furniture straps. These materials will help protect your furniture from scratches, dents, and other damage during the process loading and movement of furniture into the removal van.
Step 3: Disassemble Furniture
Disassemble large furniture items such as beds, tables, and wardrobes to make them easier to transport and maximise space in the removal van. Remove legs, shelves, and other detachable parts, and pack them separately in labelled bags or containers.
Step 4: Protect Fragile Items
Wrap fragile items such as glass tabletops, mirrors, and artwork in bubble wrap or furniture blankets to provide cushioning and prevent breakage during transit. Secure protective coverings with packing tape or furniture straps to keep them in place.
Step 5: Start Loading Heaviest Items First
When loading the removal van, start with the heaviest and largest items first, such as sofas, mattresses, and dressers. Place these items against the walls of the van to create a stable base and distribute weight evenly.
Step 6: Utilise Vertical Space
Maximise the available space in the removal van by stacking lighter items on top of larger ones. Place chairs, small tables, and other lightweight items on top of sofas, dressers, and mattresses to optimise space. Ensure that items are stacked securely to prevent shifting during transit.
Step 7: Fill Empty Spaces
Fill any gaps or empty spaces between furniture pieces with soft items such as pillows, cushions, and blankets. This helps to cushion and protect your belongings and prevents them from shifting during transit. Use packing tape or furniture straps to secure loose items and keep them in place.
Step 8: Distribute Weight Evenly
Distribute weight evenly throughout the removal van to maintain balance and stability during transit. Place heavier items towards the front of the van, closest to the cab, to prevent the van from becoming top-heavy. Avoid overloading one side of the van to prevent tilting or tipping during turns.
Step 9: Secure Everything Properly
Once all furniture items are loaded into the removal van, take the time to secure everything properly. Use furniture straps, ropes, or bungee cords to tie down larger items and prevent them from shifting or sliding during transit. Double-check that all items are securely fastened before closing the van doors.
Step 10: Consider Professional Assistance
While DIY home removals offer flexibility and cost savings, they can also be physically demanding and time-consuming. If you’re feeling overwhelmed or unsure about loading furniture into the removal van safely and efficiently, consider seeking professional assistance from trusted experts like removalsselfstorage. Their experienced team can provide loading and unloading assistance, ensuring a smooth and stress-free relocation experience.
Loading furniture into a removal van during a DIY home removal requires careful planning, preparation, and execution. By following this step-by-step guide and leveraging the expertise of professionals like removalsselfstorage when needed, you can ensure that your belongings are loaded safely and securely for transit. Whether you’re moving locally or long-distance, mastering the art of loading furniture into a removal van is essential for a successful home relocation.
Quick stop: The Ultimate Guide to Removal Vans
Step 11: Drive with Caution
Once everything is loaded into the removal van, it’s time to hit the road. Drive with caution, especially when transporting heavy or bulky items. Take turns slowly and avoid sudden stops or accelerations to prevent shifting or damage to your belongings. If you’re not comfortable driving a large van, consider hiring a professional driver or moving truck service for added peace of mind.
Step 12: Unloading Safely
Upon reaching your destination, take care when unloading furniture from the removal van. Start by removing any securing straps or ropes before carefully unloading each item one at a time. Use furniture sliders or dollies to move heavy pieces safely into your new home, and enlist the help of friends or family members for added assistance.
Step 13: Seek Assistance for Unloading
Just as you sought help for loading furniture into the removal van, consider seeking assistance for unloading as well. Professional movers like removalsselfstorage offer unloading services to help you safely unload and arrange furniture in your new home. This can save you time and effort, especially after a long day of driving and moving.
Step 14: Inspect Your Furniture
Once all your furniture is unloaded, take the time to inspect each item for any damage or issues that may have occurred during transit. Check for scratches, dents, or other signs of damage, and document any issues for insurance purposes. If you notice any damage, contact your removal company or insurance provider to discuss potential solutions.
Step 15: Settle into Your New Home
With all your furniture safely unloaded and inspected, it’s time to settle into your new home. Take the opportunity to arrange your furniture and belongings according to your preferences, making your new space feel comfortable and inviting. Don’t hesitate to reach out to removalsselfstorage for any additional assistance or storage solutions you may need during the moving process.
Loading furniture into a removal van for a DIY home removal requires careful planning, preparation, and execution. By following this step-by-step guide and seeking assistance from professionals like removalsselfstorage when needed, you can ensure a smooth and successful relocation experience. Whether you’re moving locally or long-distance, taking the time to load your furniture safely and securely is essential for a stress-free move and a fresh start in your new home.
Step 16: Reflect and Learn
After completing your DIY home removal and settling into your new space, take some time to reflect on the experience. Consider what went well and what could have been improved during the loading and unloading process. Reflecting on your moving experience can help you learn valuable lessons for future relocations and better prepare for any challenges that may arise.
Step 17: Consider Professional Assistance for Next Time
While DIY home removals offer flexibility and cost savings, they can also be physically demanding and time-consuming. If you found the loading and unloading process particularly challenging or stressful, consider hiring professional assistance for your next move. Companies like removalsselfstorage.co.uk offer a range of services, including packing, loading, transportation, and storage, to streamline the moving process and alleviate the burden on you.

Step 18: Share Your Experience
Share your DIY home removal experience with friends, family, and colleagues who may be considering a similar move in the future. Offer tips and advice based on your own experiences to help others navigate the moving process more smoothly. Sharing your insights can also help you connect with others who have gone through similar experiences and build a supportive network within your community.
Step 19: Update Your Address and Settle In
Once you’ve completed your move and settled into your new home, don’t forget to update your address with relevant parties, including utility companies, financial institutions, and government agencies. This ensures that you continue to receive important correspondence and services at your new address. Take the time to explore your new neighbourhood, meet your neighbours, and start making memories in your new home.
Step 20: Express Gratitude
Finally, express gratitude for everyone who helped make your DIY home removal a success. Whether it was friends and family who lent a hand during the move or professionals like www.removalsselfstorage.co.uk who provided expert assistance, take the time to thank them for their support and contributions. Moving can be a challenging and emotional experience, but with the help of others, it can also be a rewarding and transformative journey.
Loading furniture into a removal van for a DIY home removal requires careful planning, preparation, and execution. By following this comprehensive guide and seeking assistance from professionals like removalsselfstorage when needed, you can ensure a smooth and successful relocation experience. Whether you’re moving locally or long-distance, taking the time to load your furniture safely and securely is essential for a stress-free move and a fresh start in your new home.
Step 21: Share Your Experience
Consider sharing your DIY home removal experience with others who may benefit from your insights. You can write a blog post, create a social media post, or contribute to online forums or communities where people discuss moving tips and experiences. By sharing your journey, you can help others navigate their own moves more effectively and build a sense of camaraderie within the community.
Step 22: Evaluate Your Experience
Take some time to evaluate your DIY home removal experience and identify areas for improvement. Reflect on what went well and what could have been done differently. Consider factors such as organisation, packing methods, and time management. Use this evaluation to inform your approach to future moves and make adjustments as needed.
Step 23: Consider Professional Assistance for Future Moves
If you found the DIY home removal process challenging or overwhelming, consider hiring professional assistance for future moves. Companies like removalsselfstorage offer a range of services tailored to meet your specific needs, from packing and loading to transportation and storage. By entrusting your move to professionals, you can minimise stress and ensure a smooth and seamless relocation experience.

Step 24: Take Care of Yourself
Moving can be physically and emotionally demanding, so be sure to take care of yourself throughout the process. Get plenty of rest, stay hydrated, and take breaks as needed to avoid burnout. Lean on friends, family, and professionals like removalsselfstorage for support, and don’t hesitate to ask for help when you need it.
Step 25: Settle into Your New Home
Once you’ve completed your DIY home removal and arrived at your new home, take the time to settle in and make it your own. Unpack your belongings, arrange your furniture, and start exploring your new surroundings. Take advantage of this fresh start to create a space that reflects your personality and meets your needs.
Loading furniture into a removal van for a DIY home removal is a significant undertaking that requires careful planning, preparation, and execution. By following the steps outlined in this guide and seeking assistance from professionals. when needed, you can ensure a smooth and successful relocation experience. Whether you’re moving locally or long-distance, taking the time to load your furniture safely and securely is essential for a stress-free move and a successful transition to your new home.
Step 26: Consider Dismantling Furniture Before Loading
Before loading furniture into the removal van, consider dismantling larger pieces to make the process more manageable. Dismantling items such as bed frames, tables, and bookshelves can make them easier to transport and optimize space in the van. Keep track of screws, bolts, and other hardware by storing them in labelled bags or containers for easy reassembly later.
Step 27: Choose the Best Time to Move
While planning your DIY home removal, consider scheduling the move for the weekend whenever possible. Weekends typically offer more flexibility in terms of time off from work and the availability of friends or family members who can assist with the move. Additionally, moving on a weekend may mean less traffic and congestion on the roads, making for a smoother and more efficient relocation process.
Step 28: Coordinate with Friends and Family
If you’re enlisting the help of friends or family members for your DIY home removal, be sure to coordinate schedules well in advance. Confirm their availability for the chosen weekend and communicate any specific tasks or responsibilities they’ll be assisting with. Having a reliable support system in place can make the moving process more efficient and enjoyable for everyone involved.
Step 29: Pack Essentials for Moving Day
In addition to packing your furniture and belongings, don’t forget to prepare essential items for moving day. Pack a separate box or bag containing necessities such as snacks, water, toiletries, a first-aid kit, and any important documents or valuables you’ll need immediate access to. Having these essentials on hand will help keep you comfortable and organized throughout the day.
Step 30: Stay Flexible and Adapt
Despite careful planning, unexpected challenges may arise during your DIY home removal. Stay flexible and be prepared to adapt to changing circumstances as needed. Whether it’s adjusting your timeline, reallocating tasks, or seeking additional assistance, maintaining a flexible mindset will help you navigate any obstacles and ensure a successful relocation experience.

In conclusion loading furniture into a removal van for a DIY home removal requires careful consideration of various factors, including dismantling furniture before loading and choosing the best time to move. By following the steps outlined in this guide and leveraging the expertise of professionals when needed, you can ensure a smooth and successful relocation experience. Whether you’re moving locally or long-distance, taking the time to plan and prepare for your DIY home removal will help minimize stress and maximize efficiency on a moving day.